An update on my Scrabble board traceback and database project which I have been working on throughout the summer.
Contents 🔗
- Project Overview
- Motivation and Background
- Scoring and Traceback
- Computer Vision
- Next Steps
Project Overview 🔗
This project aims to allow users to take a photo of a Scrabble board with an already completed game, upload it, and look at the game move by move. It uses computer vision to determine the contents of the board, uses a traceback algorithm to generate all possible ways the game could have been played and asks the user to choose one (if more than one exists), and uploads the game to the database for the user to view. Currently, I only have the traceback algorithm and the computer vision completed—I will work on the remaining components in the future.
Motivation 🔗
As far as my interests in games go, Scrabble is the one which goes back the farthest. When I was around 6 years old, my older sister started attending a book club with a group of families, where one parent for each family would participate along with the involved children. The other parents would play Scrabble during the meetings, and I would join my dad to watch him play. After not too long, I started playing by myself and getting invested in the strategy of the game. I eventually started learning important words, notably memorizing all 2-letter words. To this day, Scrabble is the most commonly played game in my family, and nowadays we play it almost every time I see my parents.
Last spring, I decided to participate in the BlasterHacks Hackathon at Colorado School of Mines. However, since I had a Saint Motel concert Saturday evening and wanted to accrue a semi-regular amount of sleep, I opted to work solo and not take the Hackathon extremely seriously. My main goal was to start a project since I wanted to have a project to work on in my spare time throughout the rest of the year.
I generally don’t have the spare time and energy for side projects due to classes, extracurriculars, and poor time management, but I figured that since the hardest part is starting, it would be easier if I had an in progress project already. Ultimately, my workload ended up being too heavy to spend any more time on it throughout the remainder of the semester, but it was worth a try. I had a few ideas, but this Scrabble database was the one which came out on top, so I put on some Miles Davis and got to work.
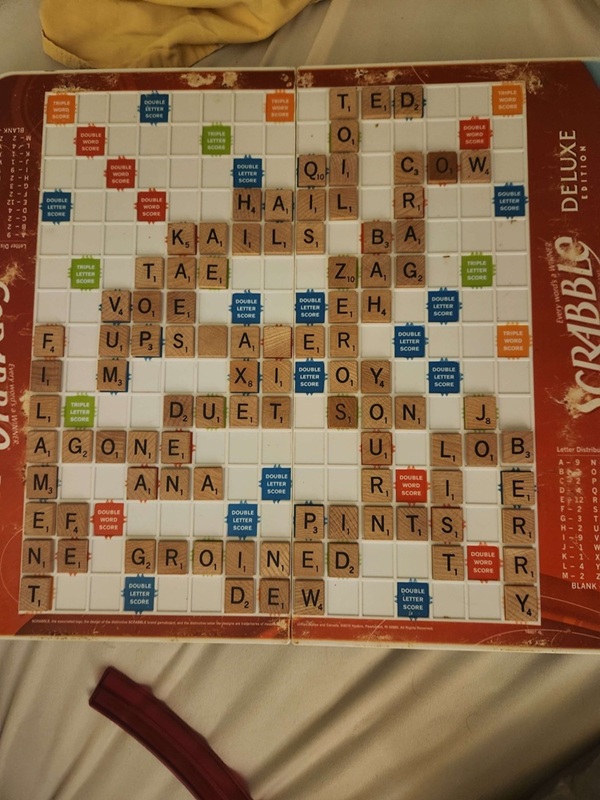
The primary Scrabble game I referenced and tested with
Scoring and Traceback 🔗
Scoring Algorithm 🔗
The first component I worked on was the Scrabble scoring algorithm. Many people had already done this before, but I figured it would be enjoyable to implement myself, so I spent the entirety of my time at BlasterHacks working on this and completing it.
The first step was to develop standards for storing a Scrabble game. I tried to find existing standards on online Scrabble sites such as playscrabble.com but I couldn’t find such a standard, so I made one myself. I opted to use a csv file to represent the grid, with empty spaces represented by ‘x’ and blanks represented by ‘_’. For the board layout, I would use numbers to represent word score multipliers and lowercase letters to represent the starting square along with letter score multipliers.
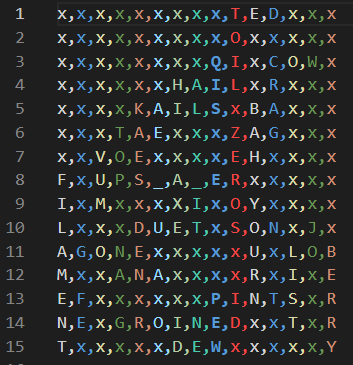
An example of a completed Scrabble game as a csv
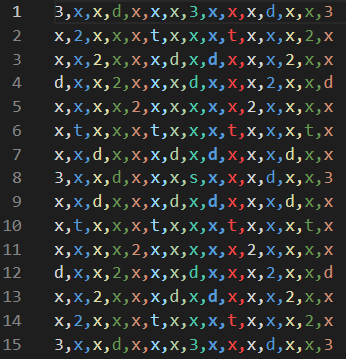
The Scrabble board layout as a csv
After developing the file formats, I wrote the algorithm. The main complexities come from perpendicular words, which must be counted as well; however, multipliers only apply activate from newly placed tiles. Given this information, the algorithm can be two parts: the first part counts the entire play, and the second part counts a word. Essentially, the first part (the count play function) checks tiles adjacent to tiles played, and upon finding adjacencies, counts the value of the perpendicular words using the second part (the count word function) and sums the result.
Traceback 🔗
For the traceback algorithm, I used a recursive function which searches for all possible moves that could have been played from each tile already on the board and selects the moves that match the target score. The move search function uses what I called an anti-board to find possible moves, which is basically the completed board minus the current board. It is also a recursive function since words played parallel to the initial square must also be considered, although the max recursion depth required for it is 2.
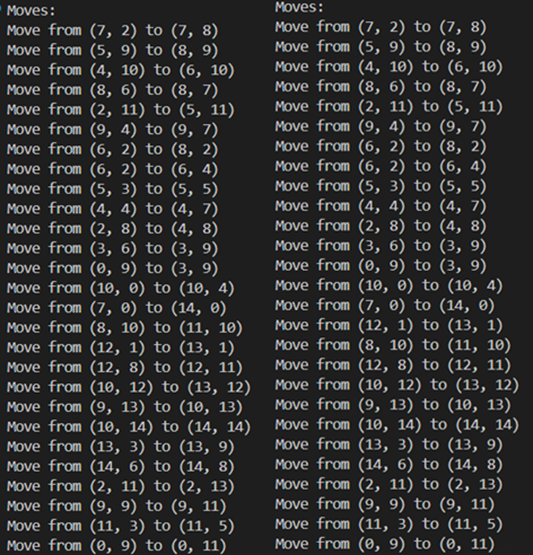
A demo of the traceback for the above game (two possibilities)
Computer Vision 🔗
This is the part that required the most time and brain power from me. I first had to detect the location of the tiles and then identify the tiles, including the blank tiles, which would require an additional step. Since I didn’t particularly want to do the entire computer vision process myself, I looked for other people’s projects which achieved similar things and found two of note.
The first project was an automated Scrabble scorekeeper by jheidel which used opencv to keep track of the board from 2012. There were some components which I used, such as the tile center calculations and the blank finding algorithm, but it required the user to add markers to boards to detect the grid, and I felt I could do better.
The second project was a Scrabble board image analyzer by carson920 which used a Hough transform to detect gridlines. This approach seemed better to me so I adopted it with a few modifications which I will cover soon.
Grid Detection 🔗
The first task was to detect the locations of the tiles, which requires the locations of the corners of the board. This process was extremely iterative for me and I tried a lot of approaches before settling on a final one. I will outline those approaches and my conclusions.
- ArUco markers
My first approach was to have the user place markers on the corners of the board when uploading the image and have the user detect them. ArUco markers are the most accurate for that, and it works pretty well, but I didn’t want to settle for requiring the user input to determine the locations of the corners.
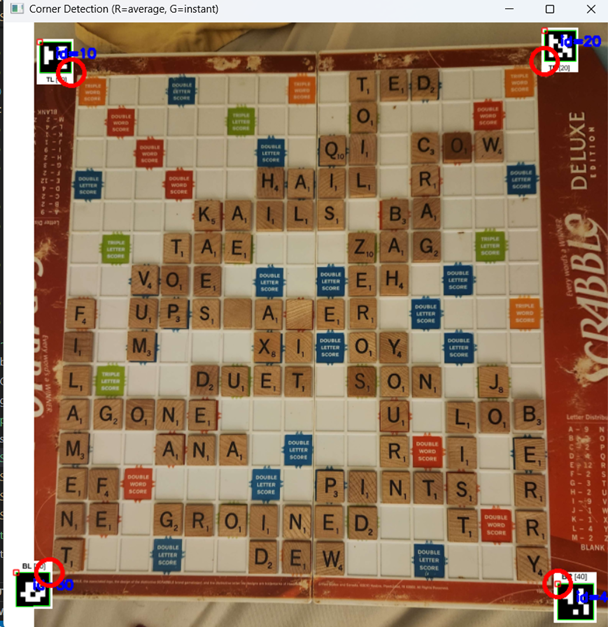
ArUco marker demo
- Color masks
My next approach was to use the colors of the tiles to detect their locations directly. The implications behind this approach working are substantial: I wouldn’t have to look at the rest of the board when classifying letters and blank detection would be trivial. Unfortunately, it is hard to create a good color mask that is board agnostic and resistant to lighting differences, but it was worth attempting.
Tile color contour demo
I also tried to use the color of the board for a mask, with the idea of drawing a bounding box around the board and recording the corners of the box. However, I encountered a massive issue with these sorts of color-reliant approaches: some boards have very little difference between the tile color and the board counter, so I had to scrap these approaches if I wanted to shoot for cross-board compatibility.

Board color contour demo
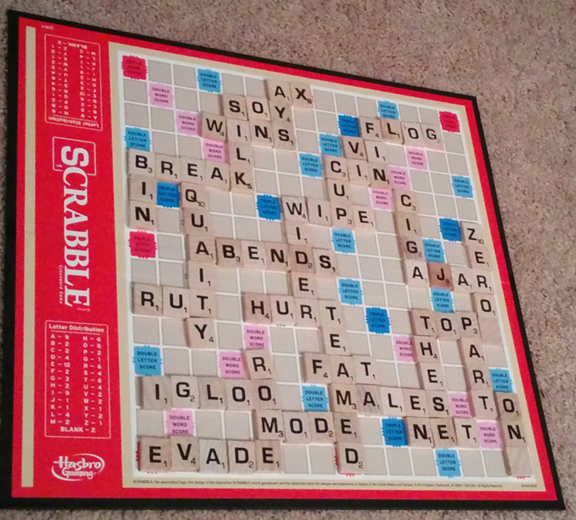
Board that is hard to use color masks with
- Gridline Detection
The third approach I invested significant time into was Hough transforms for grid detection, which is an idea I got from carson920’s project. I was able to generate pretty good gridlines for my board using the Hough transform, but using these lines to determine the corner locations would be tougher.
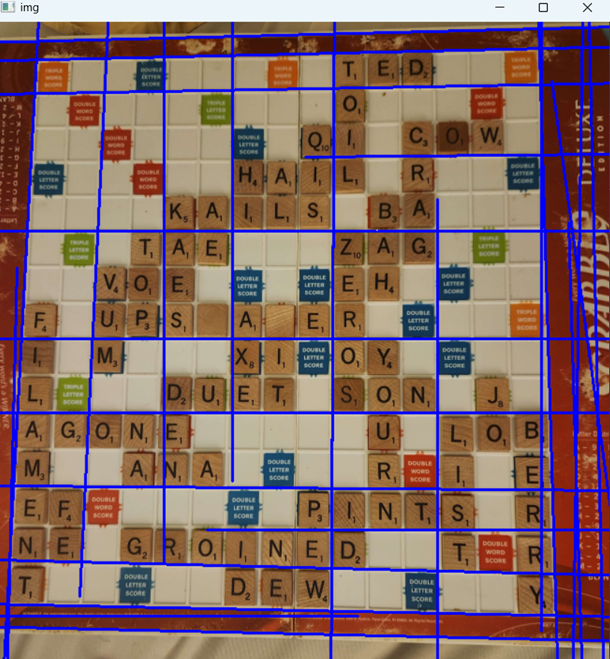
Hough transform gridlines demo
carson920’s code used the vertical and horizontal lines to create the top 3 grids, but I wasn’t sure how to select the best of the three. In the image below, there are three predictions for the right corners, with the innermost one being correct. I couldn’t find a general metric that would work on this image, so I tried to then look at modifying the Hough transform itself.
Hough transform original gridline predictions
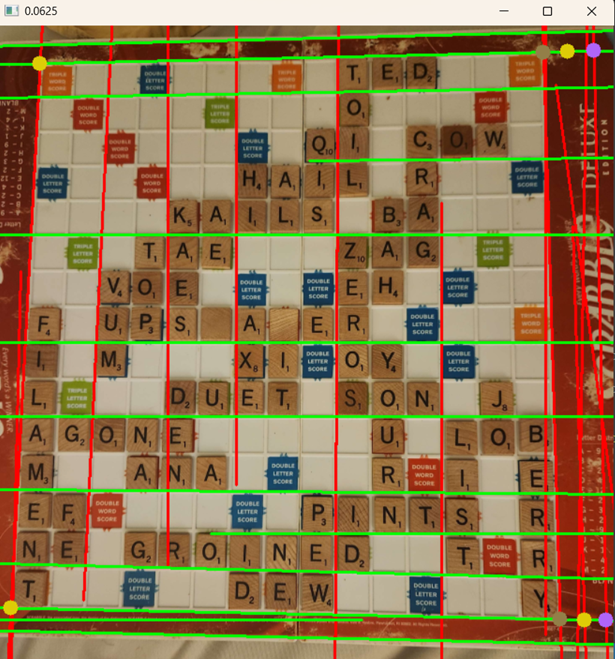
I created my own Hough lines function, with the goal of generating gridlines that would mostly lie either on the boundary of the board or along the gridlines of the board itself. I’m still not sure exactly how carson920’s line detection works, but mine seemed to do a better job detecting the gridlines within the board. I could then compare these detected gridlines with the predicted corners from the first part and use whichever corners had the smallest error. Below are the three possible boards with similarity scores to the detected gridlines in the top left corner.
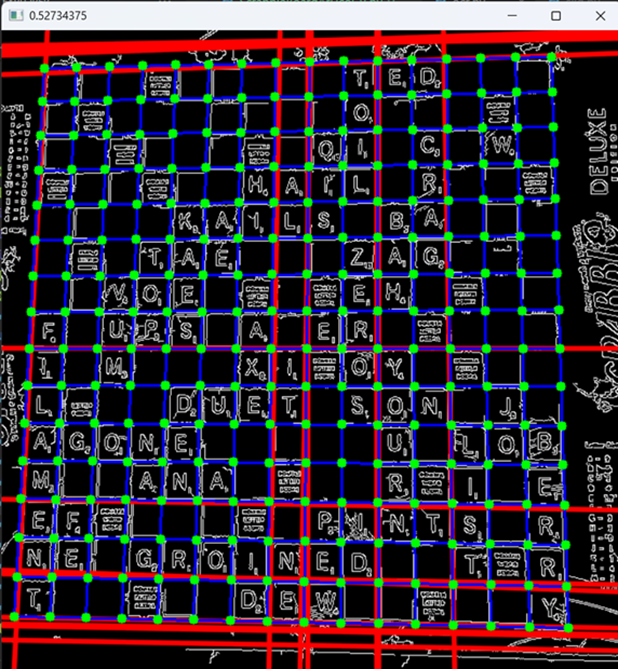
First grid prediction (score = 0.527)

Second grid prediction (score = 0.402)
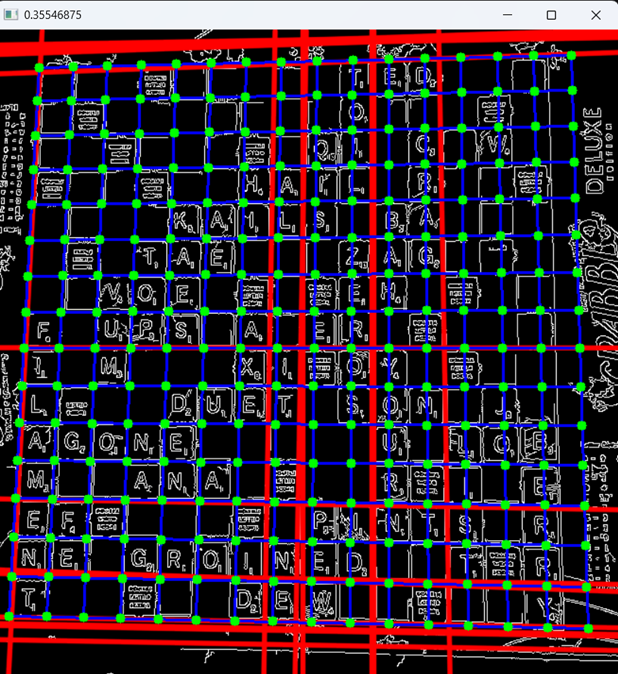
Third grid prediction (score = 0.355)
This metric is able to accurately select the corners of the board. I tested it on one other board and it was successful there as well.
Letter Detection 🔗
The last component that I worked on this summer was letter detection. This also was an iterative process which required multiple approaches and plenty of trial and error, with the final result literally involving trial and error. There were a few approaches I dismissed quickly before settling on OCR as my path forward.
At first, I tried to use a letter model which jheidel’s project used, but this requires training a model for each board used, which is simply not scalable. I then tried to use the template feature OpenCV has, but this was inaccurate. I admittedly could’ve tried to optimize templates further but I wanted to try OCR before trying to improve templates.
The two main OCR libraries for Python are pytesseract and easyocr. At first, easyocr was more accurate, but pytesseract felt more configurable. After using jheidel’s code to crop the board into an image for each square in the grid, I could use pytesseract configs to look for only one character, which improved accuracy dramatically, although I was still having some issues, mostly with ‘I’ and ‘O’ tiles.
From here, the main tinkering I was able to do lied in image preprocessing. Erosion and dilation are typical preprocessing steps for text detection, but those alone could not do the job. Perhaps the most important preprocessing step was one that I thought of myself, which was getting the connected components of the black and white tile image and removing connected components that were either too small or too large. This resulted in all of the squares either being all black, only the letter, or in rare cases the letter and the tile value. This removed plenty of noise, although the ‘I’ tiles were still only being predicted correctly half the time, even when including similar characters such as ’l’, ‘i’, ‘1’, ‘!’, and ‘|’ as possibilities.
My last step was erosion and dilation. If I could erode and dilate the ‘I’ tiles enough, the image would remain with only a narrow white rectangle, which pytesseract would be able to predict correctly pretty much always. However, this didn’t solve the inconsistencies that occurred with ‘O’ tiles, even making these tile predictions less accurate.
For ‘O’ tiles, performing more erosion and less dilation would do the trick. Making the ‘O’ lettering on the tile extremely thin resulted in pytesseract correctly classifying all 8 tiles on the whole board.
Since different preprocessings worked for different tiles, I would have to employ a trial and error approach. I would create four tile images, have pytesseract try to detect a character from all of them in order, and yield the first one that doesn’t read an empty string. Because the connected component removal handled most of the noise, I could theoretically add even more preprocessings for it to try in case I run into issues on other boards without risk of classifying non-letter squares.
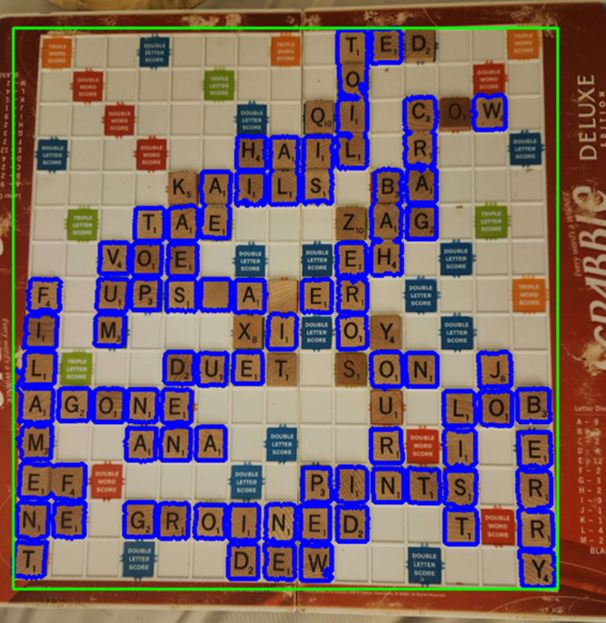
The last component was blank finding. For finding blank tiles, I essentially copied jheidel’s code with minimal changes, which was a two-step approach. The first step identifies all the non-letter squares on the board and records the mean color. The second step compares the color of the tile to all other non-letter squares and records any above a certain threshold. The code originally only compared the color of the tile to the nearest 10 or so squares, but I didn’t see any issue with comparing to all non-letter squares. This change resulted in successful finding of the blank tiles, which meant that my code could successfully identify every tile and its location on the board (n=1).
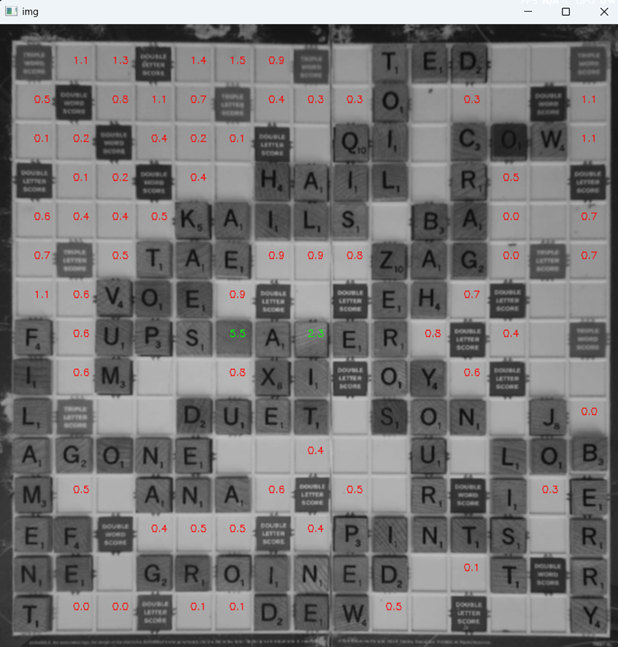
Blank tile prediction (green numbered tiles = predicted)
Next Steps 🔗
Now that I have all the algorithmic and CV-related components done, all I have left to do is to clean up and integrate my current code and create a user interface. I am hoping to make this in the form of a website, with which I will use Svelte, since it seems like a good choice for my first framework. I also will need to set up a database, which I plan to use SQLite for.
The user interface may have a few complications, mostly because my computer vision could mess up, and I want to give the user the opportunity to correct such mistakes by directly editing the detected grid. In general, giving the user the ability to edit their game data seems beneficial.
Overall, I don’t think this project will be super useful since it is hard to analyze a game without access to the players’ hands, although it could be nice to show someone a game you played and show off your amazing word or move to someone else. Nonetheless, I still thoroughly enjoyed thinking about this project and developing it, and I learned plenty throughout the process.
I hope to have more updates on this project within the next year, but for now I hope you enjoyed seeing what I’ve been working on.